
This article outlines the basics you need to have set up to track your digital fundraising campaigns – as well as five digital tracking tips that we absolutely recommend you implement straight away. Tracking your digital campaigns gives you full visibility into the success of your campaign and spend.
If you’re fairly familiar with Google Analytics (GA) tracking, then this summary will allow you to skip straight to the tip you’re interested in:
- Digital tracking basics
- GA Events
- GA Goals with Funnels
- How to remove GA parametres in reports
- Filtering out TEST sessions
- Google Chrome Extensions: Google Tag Assistant (for GTM )and Facebook Pixel Helper.
0. Basics Digital Tracking
There are 3 digital tracking elements you should be using on your website and in your paid campaigns and owned channels: Google Analytics Tracking Code; Facebook Pixel and UTM tracking parameters appended to your click URLs.
I really hope that you’re already doing this! Nevertheless I still have to mention this basic tracking set up, just in case, so that we’re all on the same page (If you already know about this, please feel free to jump to 1):
- Google Analytics: Is the free website (and app) analytics service by Google. You just need a Google account to get started. Google Analytics tells you what happens on your website – and if your tracking is set up well, where your website visitors came from.
Google Analytics is organised in 3 levels: Account -> Property -> View. At the property level configuration, you will find the tracking code you should include in ALL your website’s pages, either including it directly (you need access to the source code) or using Google Tag Manager (GTM) if you already have it installed. If you are using WordPress for your site, there are many plugins to help you implement this, like MonsterInsights (which allows you to also have some reports in WordPress backednd) and Google Tag Manager for WordPress (which is a broader option, since you can use it to install Google Tag Manager and then install Google Analytics, along any other tag, whit it).
- Facebook Pixel: Similar to Google Analytics tracking code, Facebook has its own tracking code called “Pixel” that you should also install in ALL your website’s pages. This pixel serves two main purposes: (1) Track Facebook users that visit your webpages and (2) track conversions for your campaigns. Many people think that you only need to have the Pixel active while you are running campaigns, but that’s not true. You should always have the pixel activated in all your website’s pages. “Why?” I hear you ask? Because you can use Pixel’s tracking information to create target audiences to serve your ads to (Remarketing) as well as finding audiences similar to your own, these are called “Look-a-like”.
- UTMs: Are URL parameters (key-value pairs after a “?” at the end of the URL, separated by “&”) you add to the end of your landing page URLs (the page URLs you choose to point at on your website). Google Analytics uses the UTM parameters to populate their reports (utm_campaign, utm_medium, utm_source, utm_content and utm_term). It’s information you append to your URLS to be used by Google Analytics in their reports (utm_campaign, utm_medium, utm_source, utm_content and utm_term). Some services (like Google Ads) put UTMs automatically into their campaigns, and in some cases Google Analytics is capable of figuring them out, but as a rule of thumb: “Always Use UTMs on your click URLs!” You can create them online one by one, or you can use an Excel template for this (feel free to contact us and ask for the template we use, we will be happy to share it with you!) Technically, you can put whatever you want in the UTMs values. But, there are some conventions you should follow to get the most from your Google Analytics’ reports. The most important is regarding utm_medium; since the information you put there is what Google Analytics will use to group your traffic into the default channels.
1. Google Analytics Events
Use ‘Events’ when there is an action your user takes that indicates interest – like downloading an image or calendar or PDF, or shows intent – such as clicking a ‘tell me more’ button.
Most charities use Google Analytics. But most of them also tend to underestimate the use of Google Analytics Events. What are events? Put simply: events are something that happens in your website that you are interested in tracking – such as the “next” button in a 3 step donation form, or a specific “Find out more” button on your website. And here is an important distinction: it can be a Goal for your organisation, but it doesn’t have to. A Goal is usually a lead or enquiry or download or something very measurable as an action. An event may be an indicator or step a user takes before they complete the goal. You will be surprised by how much events can tell you about your site and your users. You can have events for tracking things like scroll depth, % of video watched, button clicks, outbound links, elements seen and much more.
You can implement all these events using Google Tag Manager (GTM) and it’s easier than you think; but it would be too long to include in this post. Leave a comment if you want me to write a blog post about “Step-by-Step GTM implementation for tracking events”.
2. Google Analytics Goals with Funnel
Use ‘Goals’ when there is a specific objective completed – such as a form submitted. Use ‘Funnels’ with Goals when you want to track the steps your user has to take to complete the goal.
Unlike Google Analytics Events, most charities use Goals, mainly because they are relatively easy to set up when you choose “Destination” page as the Goal Type.
Goals in analytics are objectives for your organisation (financial or non-financial) that you want to track. You can use a key variable in several Google Analytics reports in order to have insights about conversion rate, average value (if financial), channel performance etc.
The most used Goal Type is “Destination”: which is based on the page path the user is viewing and means “fire this goal every time a user visits this page.” The most common use is for “thank you” pages.
The main things you need to know about Goals are:
- It’s based on pages from YOUR site. For example, you can NOT set your Charity’s Facebook Page (www.facebook.com/charityuser) as a Destination Goal because you don’t own Facebook (unless you are Mark Zuckerberg reading this blog post, in which case go ahead mate). Same thing applies for any page outside yours, or more accurately, any page that doesn’t have your Google Analytics Property’s tracking code installed.
- Usually, you MUST put only the path. Except in very specific cases, your destination goal is the path of your target page. The path is what starts with a “/” after the domain ending (this is “.com”, “.com.au”, “.net”, etc) in the URL. For example, in this URL https://parachutedigitalmarketing.com.au/resources-and-free-stuff/ the path is /resources-and-free-stuff/ (by the way yes, we give away a lot of free and useful stuff to download that you should totally check out after reading this post. You can click it now and it will open in a new tab for later). Google Analytics will ignore the other part (https://parachutedigitalmarketing.com.au), so you must include ONLY the path. I’m stressing the word ONLY because it’s not optional. If you mistakenly put the full URL like “mycharity.com/thank-you” it will never match and the Goal will never fire and your tracking is null. So you MUST put just “/thank-you”.
- Be careful with the Match Types: Match types is the method Google Analytics uses to compare the destination you entered in your goal against the pages that users visit. The default option is “Equals to” but this can be a problem. To understand why, here is brief explanation of each match type:
- Equals to: As mentioned, this is the default option. It means that the page the user is on must completely match (exactly) what you have entered. Just one character more or a character less and there is no match. This could be a problem because many times “Thank You” pages include extra parameters that are dynamic (like firstname personalisation or transaction ID). This can prevent the match from happening and the Goal from firing. For example, if you set a destination “/thank-you” but your thank you page looks like “/thank-you?transactionID=1234” even when the user has completed the action that represents a Goal, this won’t be counted, because “/thank-you?transactionID=1234” is not exactly the same as “/thank-you”.
- Begins with: This is the one you should use in the previous example, since Google Analytics will check that the page visited by the user begins with what you have set as destination. If you use this match type in the previous case the Goal will fire because “/thank-you?transactionID=1234” begins with “/thank-you”. Remember to make sure there are no other pages starting the same way in order to avoid false positives.
- Regular Expression Match: This is for advanced matching rules using a codification system called “Regular Expressions”.
So, those are the main things you should know about Destination Goals. However, there’s another interesting feature available for Destination Goals that you should use when possible: Funnels. This is what you want to use to track drop off rates. Funnels are a series of “previous steps” that the user takes before completing the goal, represented by pages (using the same Match Type as the Goal Destination, the last step is the destination goal itself but you should NOT include it in the Funnel section).
If you create a funnel, you will be able to access a very interesting and insightful report called “Funnel Visualization” (Conversions -> Goals -> Funnel Visualization). You can set up the first step to be required, if you want ALL journeys to start there, otherwise goals will count even if they start half-way through the funnel. Sometimes people avoid using funnels because they are afraid of “missing goals” in the reports due to bad configuration of the steps. But,
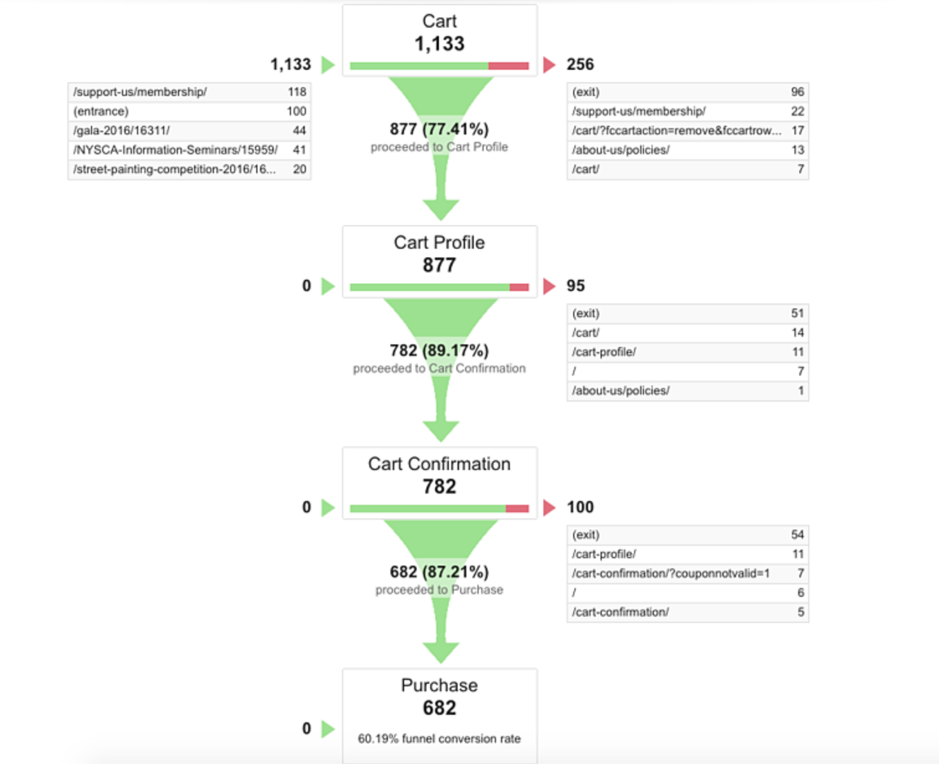
what most digital folk don’t know is this: the Funnel steps you set up affect only thereport. All other reports (like “Source Medium”) are NOT affected.
In conclusion: Use funnels, you have nothing to lose and a lot to gain.
So far, we’ve been talking exclusively about “Destination” type Goals. But, if you are using Google Analytics Events as recommended in the previous tip, you will be glad to know that apart from “Destination”, you can use “Events” to create goals. If you are tracking outbound links, you could use this Goal type to correctly track the case when people click a link to your charity’s Facebook page.
3: Remove URL parameters in GA reports
This is a quick fix.
Have you ever tried to analyse your Google Analytics pages report (under Behaviour -> Site content -> All pages) and found something like this?

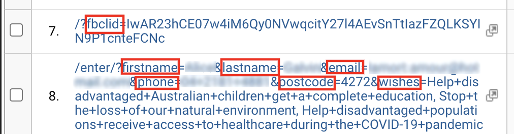
This is a problem, not only because it looks “ugly” and it’s hard to read. But also because for example pages 1, 3, 4, 6 and 7 in the report are the same page, this is the “/” which represents the homepage. But since each page includes an unique value after “fbclid” (which by the way it’s an ID that Facebook adds to your URLs to identify users), Google Analytics interprets them as different pages; unfortunately this doesn’t affect just a few pages: each person that clicked your ad will generate a (false) “new” page in your Google Analytics Report.
Something similar happens to pages 8, 9 and 10 in the report above . But this time it’s even worse! If you look closely you will notice that the parameters are not just random IDs but some of them contain personal information (which I have blurred in the image), namely: first name, last name, email and phone. This could seem as a good thing at first sight, since you are able to track what identified individuals do in your website. However, this is strongly against Google Analytics privacy policy and usage guidelines and is a violation to the Analytics terms of service. Therefore, you should NOT have this information in your reports.
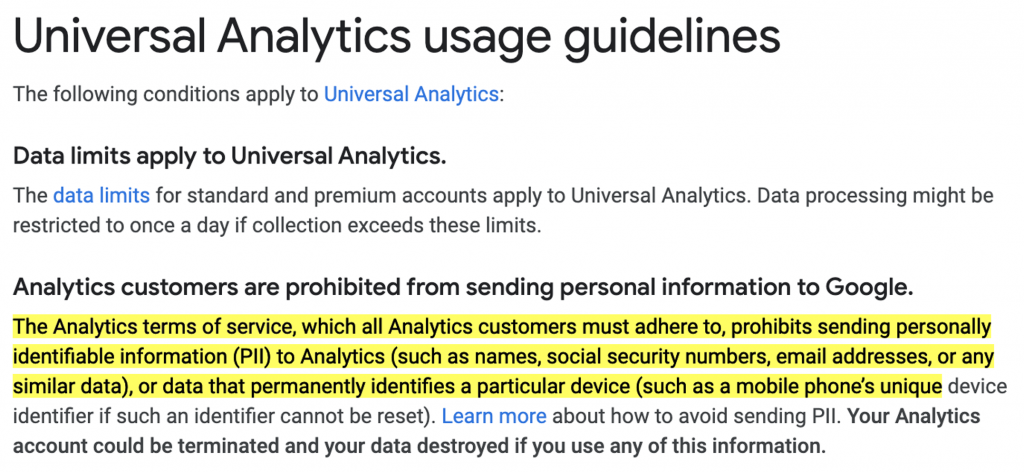
Source: https://support.google.com/analytics/answer/2795983
Then, how do we fix this? Super simple!
The part of the URL generating the problem is the query string, which is what comes after the “?” and has a set of key=value pairs separated by “&”. You may recall this when we talked about UTM parameters.
- First we need to identify the “keywords” or “attributes” we want to filter out from the reports. From the print: fbclid, firstname, lastname, email, phone, postcode and wishes
- Then we just need to go to Admin -> View setting and enter them (separated by comma) in the input field “Exclude URL Query Parameters”
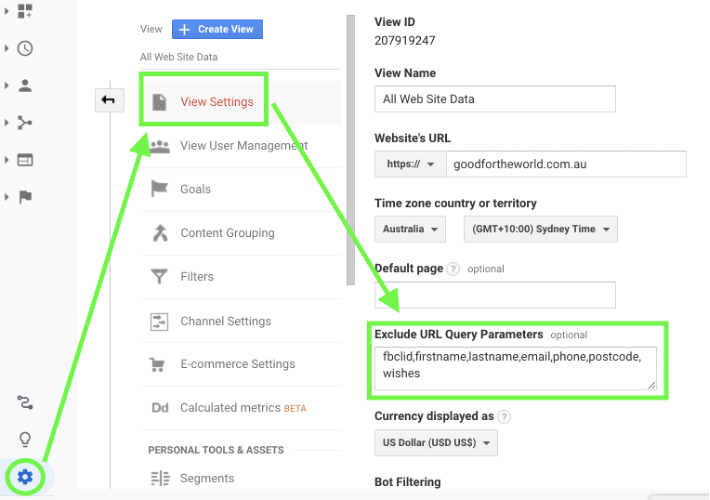
And that’s it! Problem solved 🎉… easy, right?
Note that this will only affect your reports from the moment you set it – it’s not retroactive and won’t change your past reports – and it’s not going to change anything in your website. The actual page and all the parameters will remain there, Google Analytics will just ignore them for reporting purposes.
4: Tagging and Filtering out TEST sessions
When you are setting up tracking for a new campaign, you need to test A LOT and when you need to make changes or fix issues you need to run new tests while the campaign is ongoing. These tests (especially those while the campaign is running) can affect the results you see in the reports, that’s why it’s important to exclude them. There are many ways to achieve that, but this is the one I use most often:
1) Tag your test URLs: add UTM parameters to the URLS you use for testing. Setting at least one parameter as “test” or any other keywords you remember like “test_whatever”. For example, if you’re testing the page www.mycharity.com/xmas-appeal/ you could use this while testing www.mycharity.com/xmas-appeal/?utm_campaign=test_campaign&utm_source=test_source&utm_medium=test_medium&utm_content=test_content&utm_term=test_term . If for any reason you can’t use “test” UTM tags, you can make up a pair key=value, like this_is_a_test=yep. So, when testing you can use www.mycharity.com/xmas-appeal/?this_is_a_test=yep (just remember to use letters and numbers only, separated by hyphen as a convention). The important thing is that at least one part remains constant. yIn this next step let me explain why.
2) Filter out your tests in the reports: Google Analytics comes with a bunch of cool options to segment your reports’ data. It also allows you to create your custom segments based on conditions.
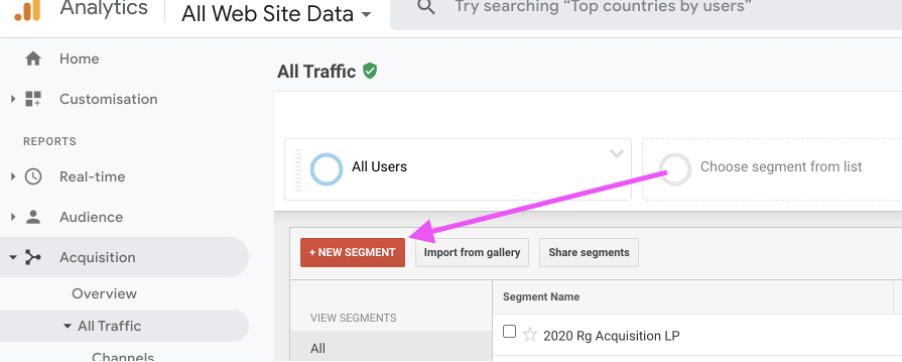
To create our segment, in any report go to “+Add segment” -> “New Segment”.
This will open the segment creation window.
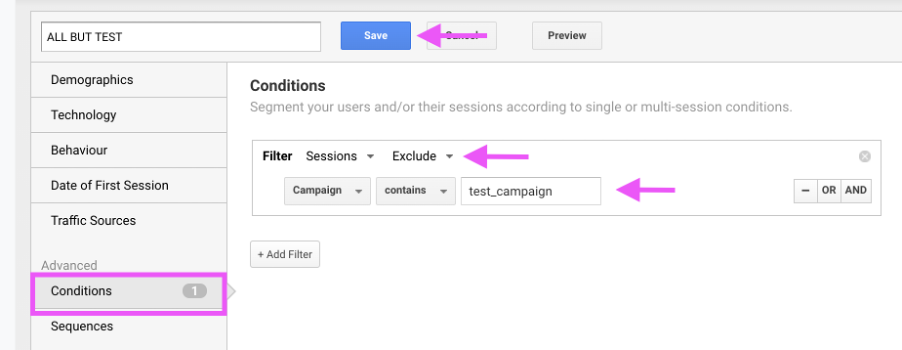
Then go to “Conditions” and create a condition that matches what you set on step 1. In my first example the condition could be “Source contains test_source”.
For the second example it could be “Page contains this_is_a_test=yep”.
Change the filter mode from “Include” to “Exclude”.
Now this segment will have all the traffic EXCEPT your test traffic.
Give your campaign a name like “ALL TRAFFIC BUT TEST”. Save it and you’re done!
This is a very specific use case, but Segments are a very powerful tool In Google Analytics, so I encourage you to explore and play around with all the available options. You can even compare up to 4 different segments at the same time.
5: Using Google Tag Assistant and Facebook Pixel Helper Chrome Extensions
Google Tag Assistant is a free Chrome Extension that gives you helpful information while testing a website. Enabling the extension in your browser will show you information about the Google Tags installed (which are the pieces of code to install services like Google Analytics, Google Tag Manager, Google Ads, etc) on the website. It uses a traffic light colour scheme to indicate the status (Green: all good – Blue: minor implementation issues – Yellow: warns you that the implementation may lead to unexpected results – Red: means that a tag was found with critical implementation issues).
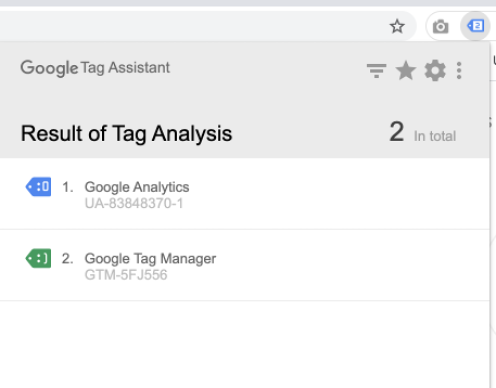
This is very useful when you need to make sure everything is installed correctly.
For example, you can check that the ID of the Google Analytics Tag (below its name, UA-83848370-1 in the screenshot), matches the ID of your Google Analytics property.
But there is an even more useful feature in Google Tag Assistant that it’s “recording”. After you enable the extension, you will see a button with
the text “RECORD”, you need to press it and refresh the page to start recording (you will notice that the extension icon now has a red dot ). Recording means you can navigate through several pages and when you are done you can access a full report (nothing in your screen is recorded as a video or similar, it only means you can use the extension in more than one page while recording is ongoing).
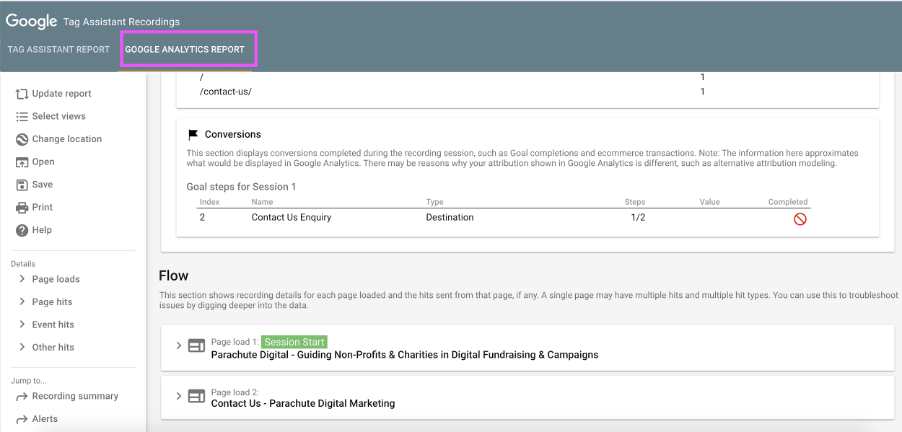
After you have gone through all the pages you needed to test, you press “STOP RECORDING” and a new button will appear for you to watch and see the report. The default report is about the tag analysis as discussed so far. But, if you have access to the Google Analytics account that is installed on the page, you can also see a “Google Analytics Report.” This contains in-depth information of what’s being sent to Google Analytics (Session, UTM Tags, Events, Goals, Transactions, Pages Views, etc). This last report is extremely useful to make sure everything is going as expected as well as find and fix errors.
This is a typical testing flow I use for donation campaigns and appeals:
- Go to the Landing Page (remember to add the Test parameters!)
- Enable Google Tag Assistant extension in Chrome and start recording: by clicking the icon and hitting the “RECORD” button
- Refresh the page (this is important because otherwise the first page is not going to be recorded)
- Check that your Google Tags are correct
- Make a donation
- Stop Recording: by clicking the icon and hitting “STOP RECORDING”
- See full Google Analytics report: by clicking “Show Full Report” button and on the report window, open the “Google Analytics Report” tab (remember you need to have access to the Google Analytics property in order to be able to see this report).
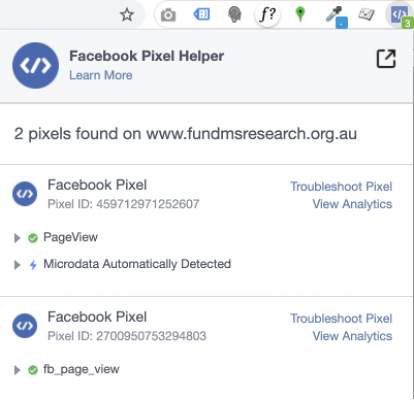
Facebook Pixel Helper is also a free Chrome extension, but in this case it’s used to get information about Facebook Pixel installed on the page.
You don’t need to activate it. Once a Pixel is detected, the extension icon will turn blue with a green number indicating the amount of events it has detected.
This is useful to check whether the right pixel is installed (by comparing the Pixel ID with the one on your Facebook Business Manager) and also to check if other events are firing as expected (for example, if you set a “Donation” event to fire after a conversion).
There’s no feature equivalent to Google Tag Assistant’s “Record”, but next to each pixel there are links to Facebook Business Manager. This allows you to see Analytics or Troubleshot the pixel (you need access to the Facebook Business Manager that owns the Pixel).
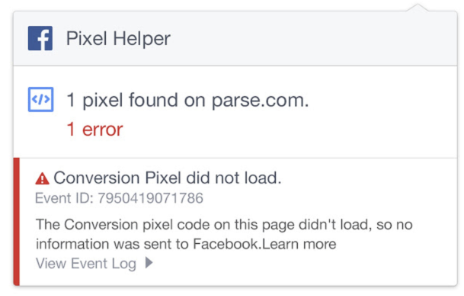
If there is an error with a pixel, you will see a message like this one:
Google Tag Assistant and Facebook Pixel Helper are both very useful extensions to Chrome.
Digital campaign tracking – for measuring success and ROI
The beautiful thing about digital marketing, as a channel, is that you are able to track and measure every second, click, scroll and action taken. We know exactly what behaviour people have and the actions they take online.
But only if your tracking is set up. And only if you’re actually reporting on what your supporters are doing on your website. Google Analytics and Facebook are extremely powerful tools to provide huge insights and help you make data driven decisions. But only if you’re actually using them. You don’t have to use the full functionality, just more than the basics.
If you need any help, get in touch. We can help you work through any problems you’re having.